#11 HOW TO: Set up memberships to turn anonymous readers into subscribers

Whether you are looking to build a following or selling a product through your Ghost.org site/blog, you will want to turn anonymous readers into subscribers so they are engaged in your brand and can stay informed about your site. The best way to do this is by setting up memberships. Memberships can either be free or members will have to pay for access to posts/products. To incentivise readers to sign up, you can make certain parts of your site or courses, members-only and even, send out regular newsletters to members-only to keep them updated and interested in your site. For example; In a previous Tuscany blog post I wrote, I made digital planners free for anyone who subscribes to my blog as an incentive to sign up.
You should consider having paid memberships as a part of your business plan as it's is a fantastic way to monetise your blog and generate revenue, even potentially more than ad revenue. This is especially important when there is a skill than you teach the readers about. The majority of people are looking to learn something new and that will benefit them. So, allows make it geared to what the readers will gain from signing up. For example; if you're an avid photographer, you could have a photography course for people who sign up to your site. Or digital products is a big selling point too!
Through Ghost.org, you can choose to allow members access to premium publications (unique content specifically for your members), paid newsletters (regular bulletin for members), new media (inform members of YouTube videos or podcasts) or communities (create comment sections for members). It's up to you!
So, how do you set up memberships on Ghost.org... well, keep reading to find out!
This blog post will cover:
- Set up free memberships and a 'welcome' page for new subscribers
- Set up Stripe for payments for paid memberships
- Set up a pricing plan for premium paid memberships
- Customise your member sign-up/sign-in portal
- Links to my other 'how-to' blog posts
If you need help with other aspects of Ghost.org/Google Domains, follow my 'how-to' blog post series linked at the bottom of this blog. A new 'how-to' blog post will be released every Thursday.
Set up free memberships and a 'welcome' page for new subscribers
If you are looking to just build a following then, you'll want to set up free memberships for subscribers.
Create a 'welcome' page for new subscribers
To set up your 'welcome' page, follow these instructions...
- You need to be logged into your Ghost account and click the 'pages' button on the left-hand menu.
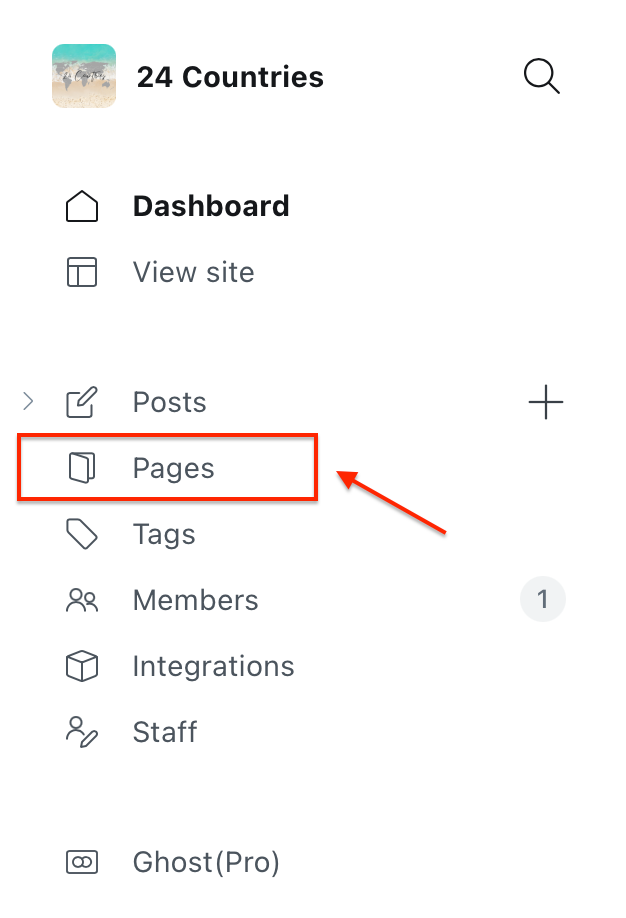
2. Click 'new page' up the top right-hand corner.

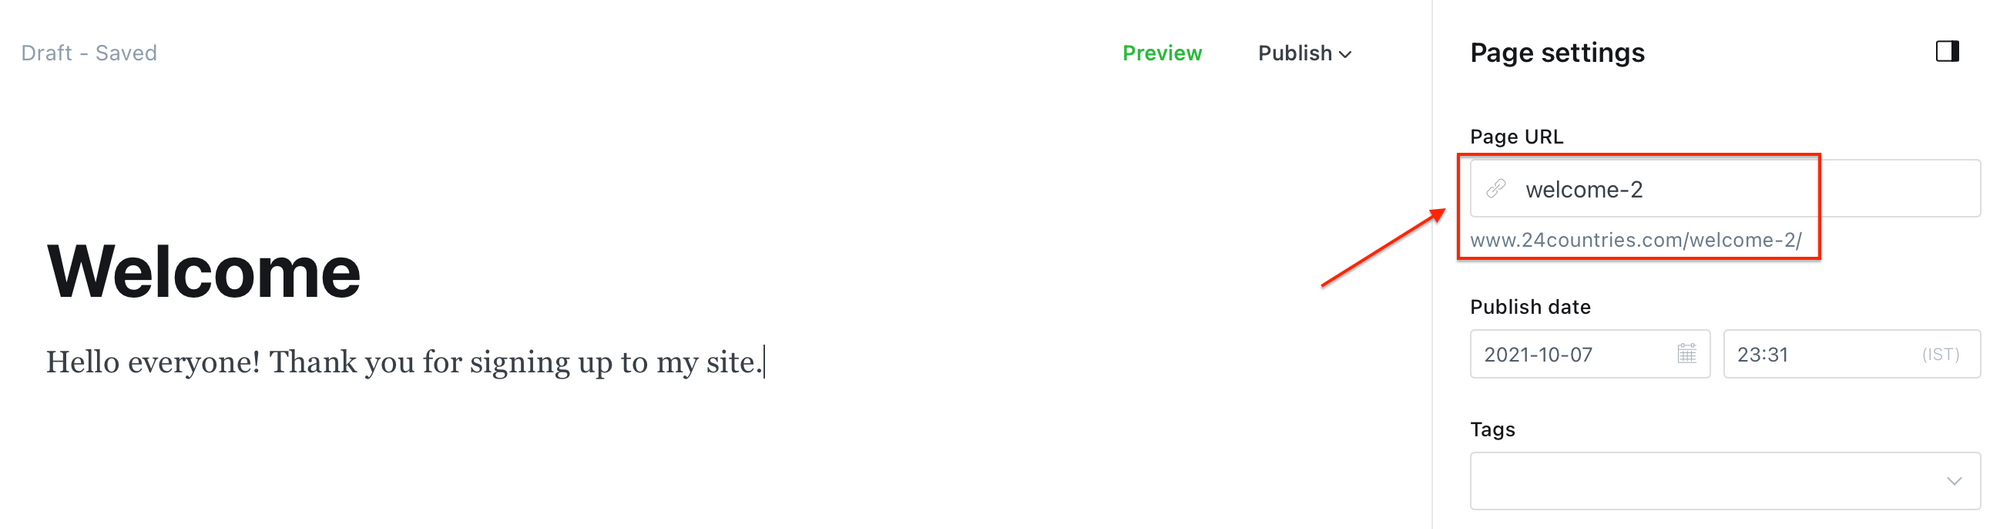
3. Customise your 'welcome' page for new subscribers to introduce them to your site. This page will save as a draft until you choose to publish it. The most important part is the URL of this page which you can find by clicking the box up the top right-hand corner.
4. Next, click on your settings down the bottom left-hand corner. This button...
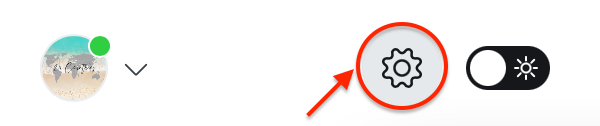
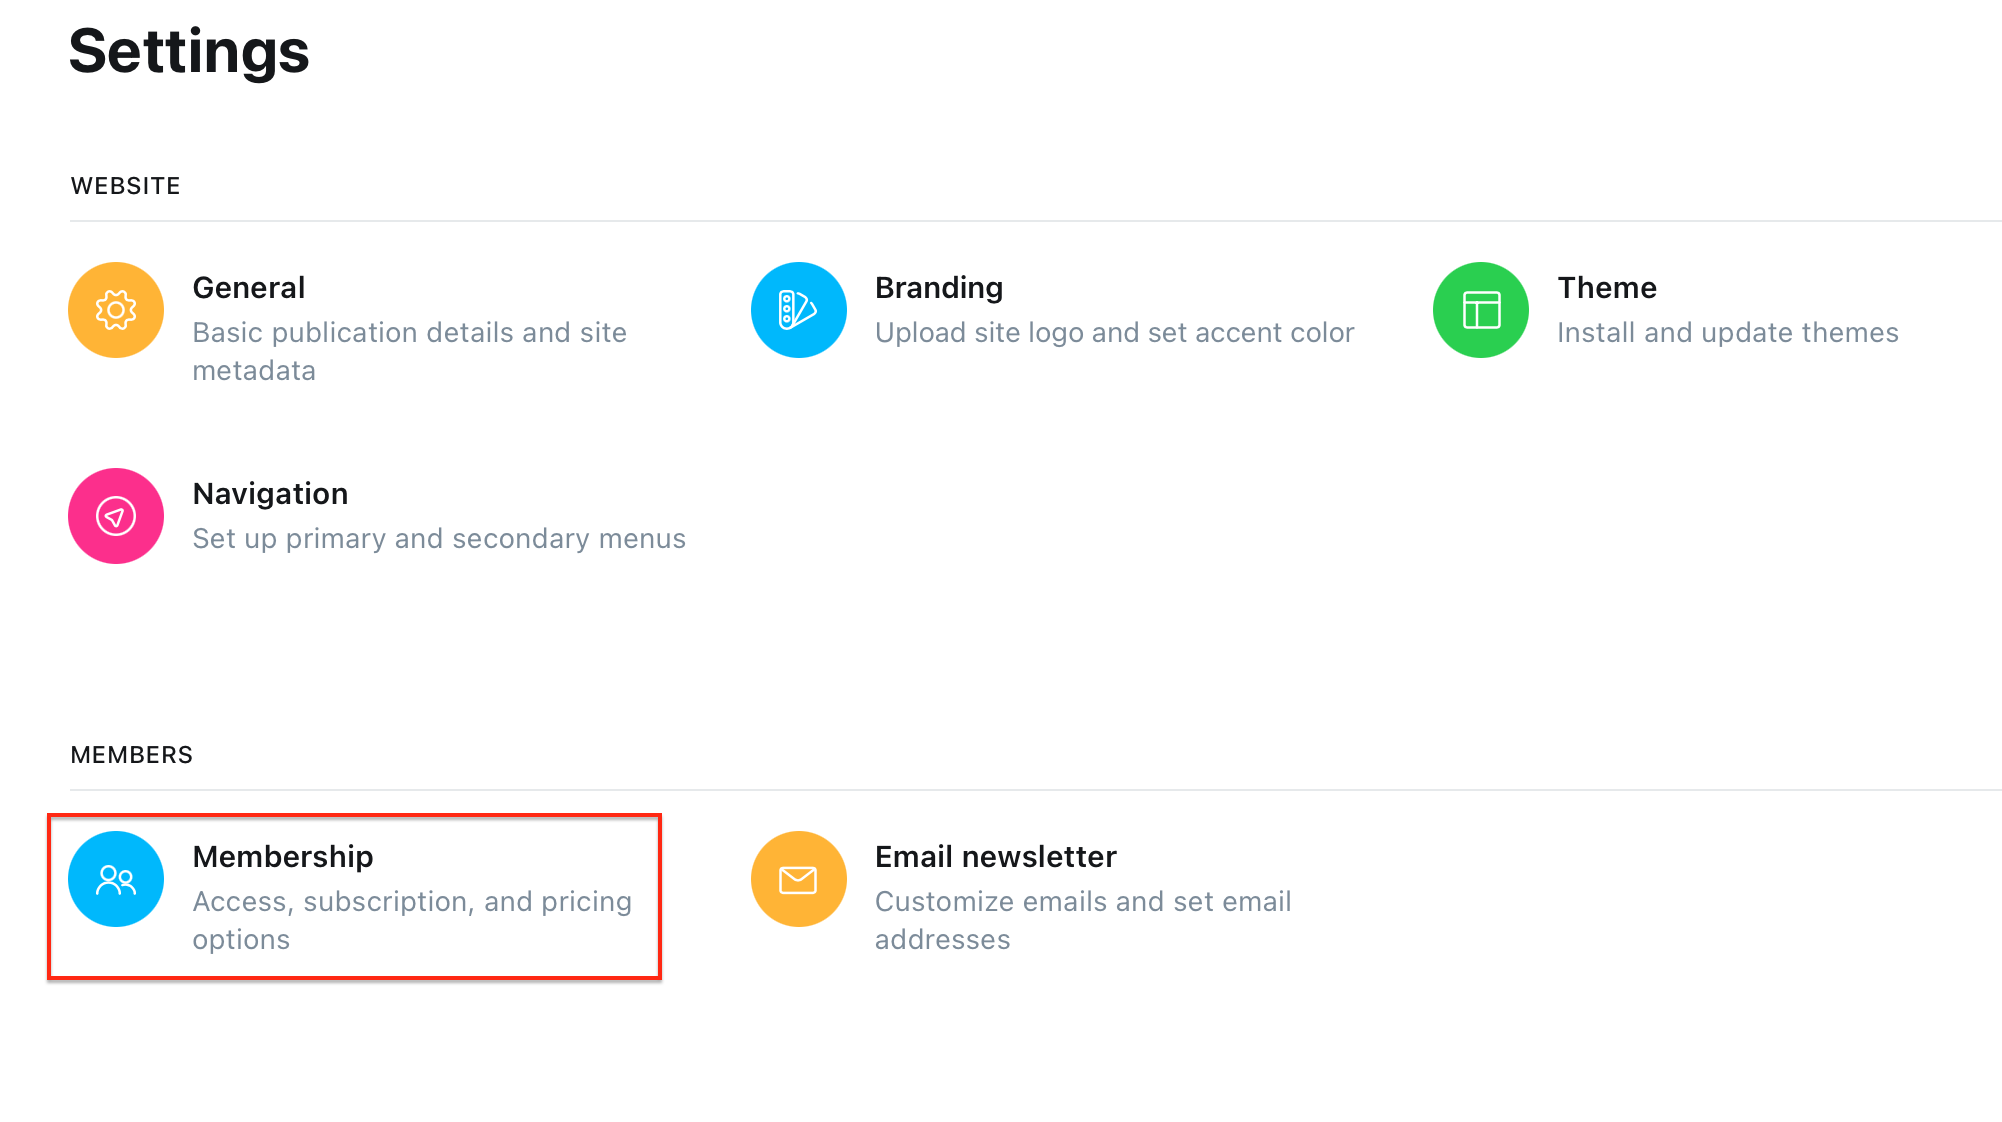
5. Within your Ghost settings and under the 'members' section, click on the 'membership' tab (highlighted in the picture below).

6. Go down the bottom of this page to the 'membership tiers' and in this section, write the URL for your 'welcome' page into this box (pictured below)
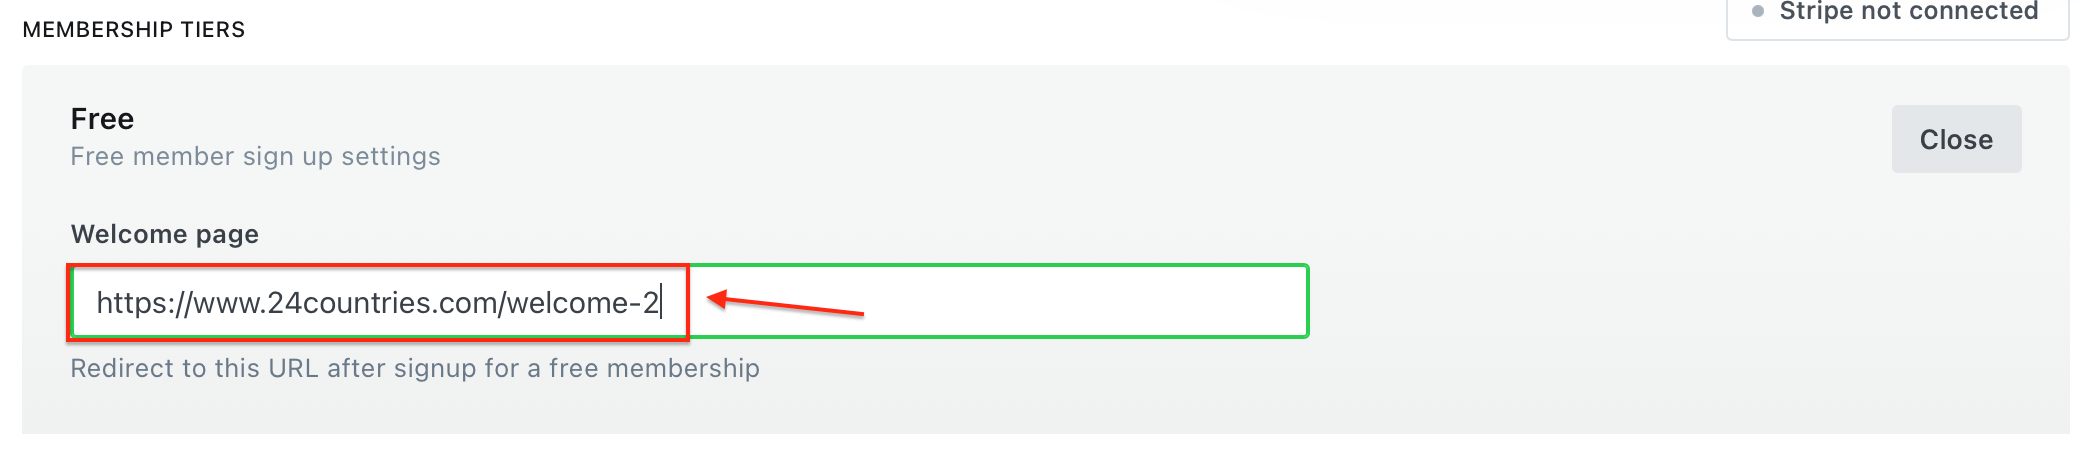
This should link your welcome page to your membership sign-up. So, when members sign up for free they will be taken to this welcome page.
Set up stripe for payments for paid memberships
You have to decide whether you are going to take payments from your members. The reason being this will impact everything else like the sign-up/sign-in portal and membership tiers/payment plan. Ghost.org is partnered with Stripe to take payments so you will need to set up a Stripe account. Also, Ghost takes no fees on transactions through Stripe!
- Go to the 'member' section in your settings, click on the 'membership' tab (highlighted in the picture below).
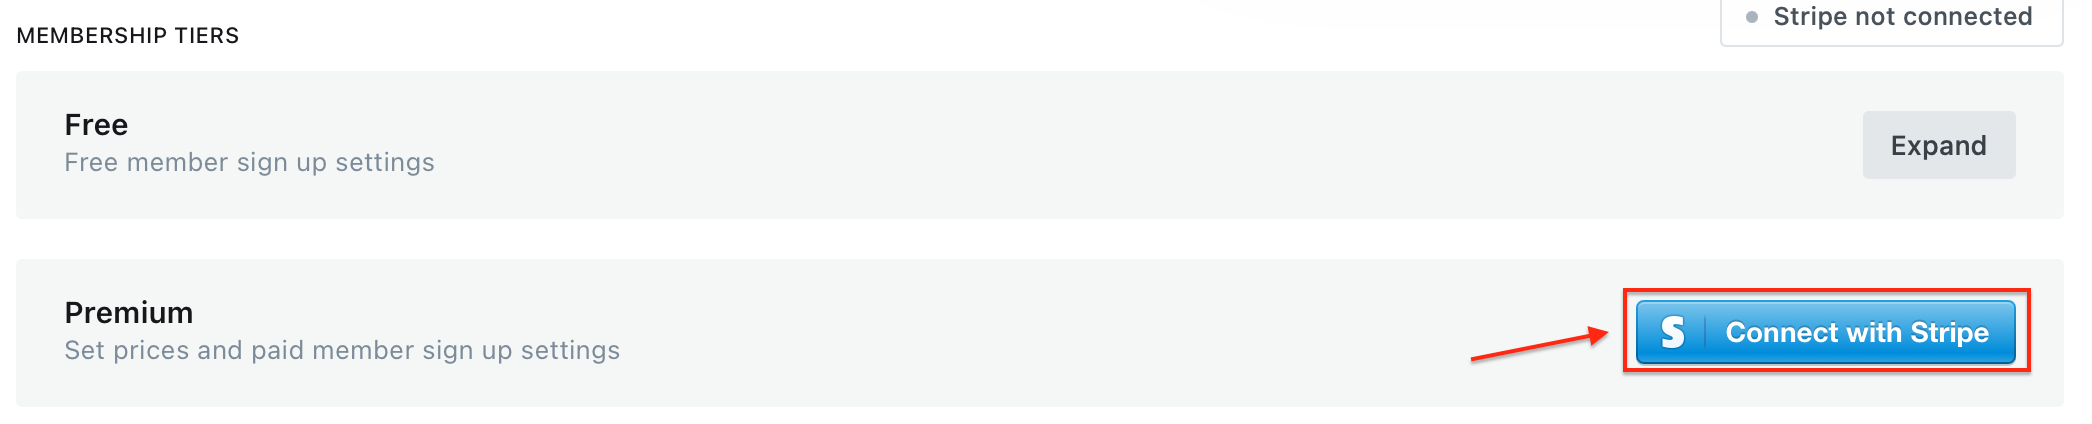
3. Under 'membership tiers' at the bottom of this page, nex to 'Premium' click 'connect with Stripe'.
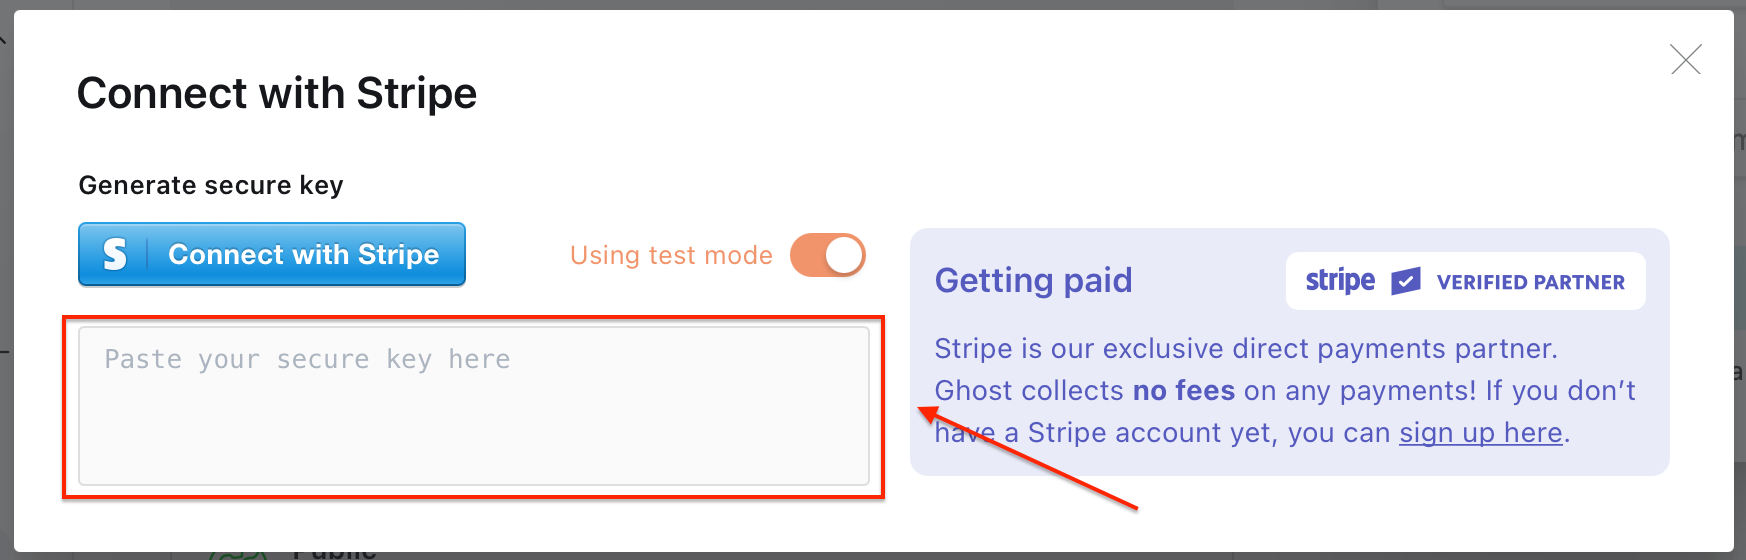
4. This will pop-up and again, click 'connect with Stripe'.

5. You will be asked to sign-up to Stripe by setting up an account. Once, you have done this, it will generate a secure key.
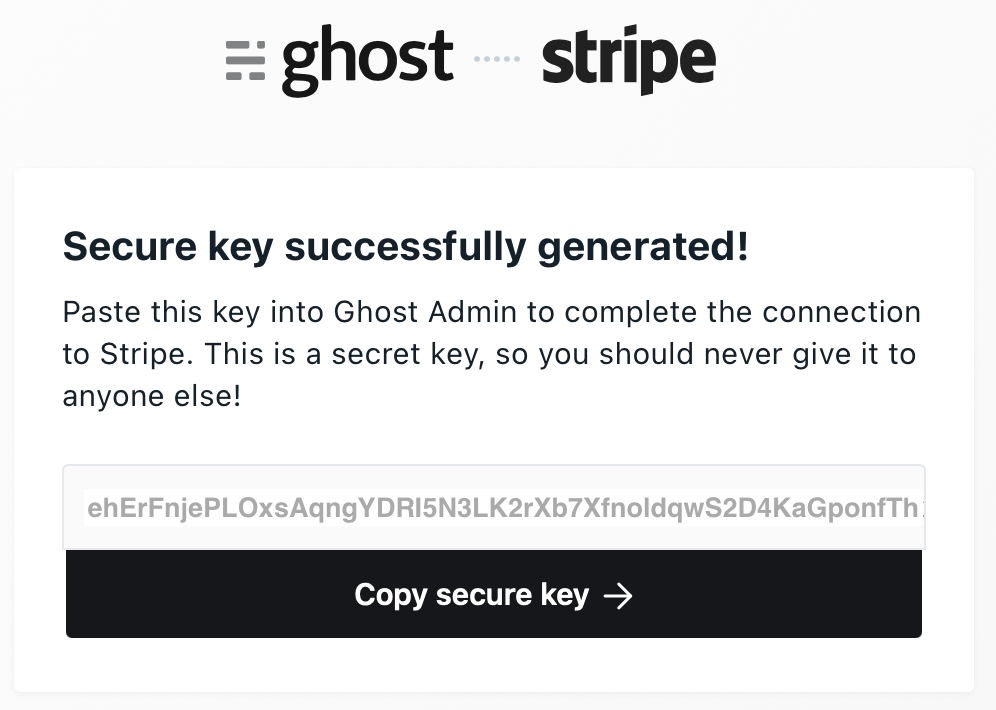
6. Go back to your 'membership' section of Ghost and input your secure key that you just generated in this box.
You should now have connected your Ghost.org site to Stripe!
Set up a pricing plan for premium paid memberships
- Once you have connected your Ghost.org account to Stripe, you can create your price plan. Ghost gives you the option for monthly or annual subscriptions. The prices you enter on your paid memberships will sync with Stripe, so if you update them in the future, they will be updated on Stripe too.
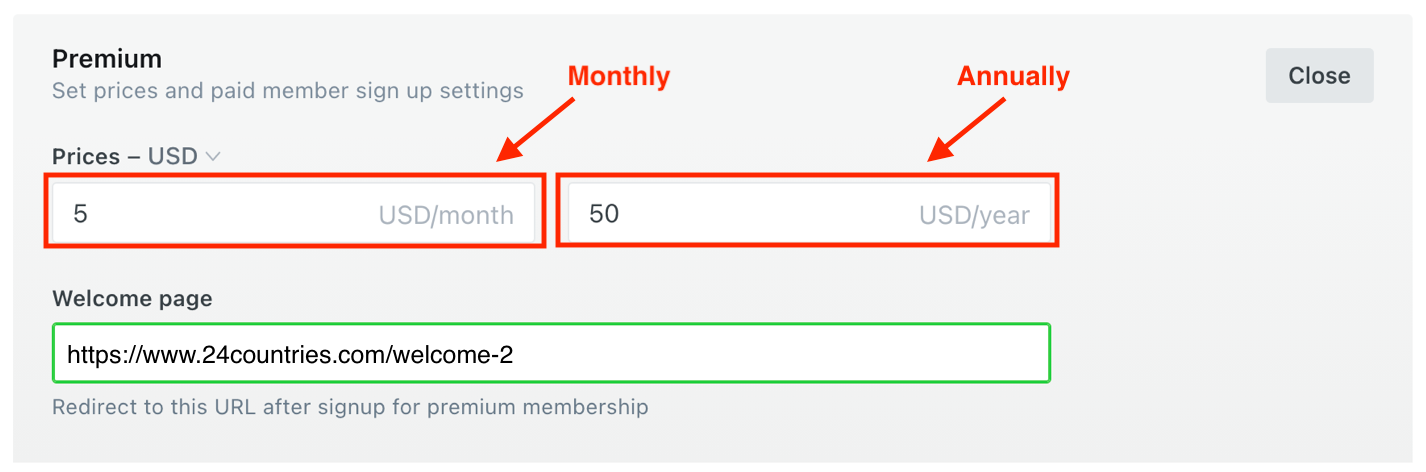
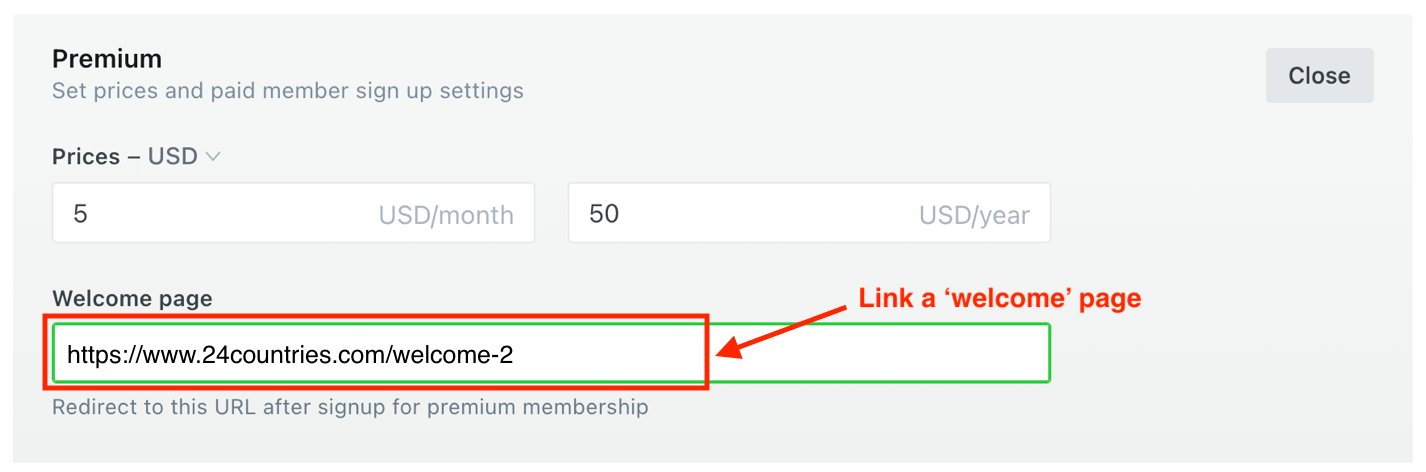
2. Again, you can link a 'welcome' page to the paid membership sign-up meaning that when members sign-up, they will be redirected to the 'welcome' page which introduces them to your site.
Customise your member sign-up/sign-in portal
- Firstly, you can choose who can subscribe to your site and who can access your posts. For subscription access, you get three options; anyone can sign up, only people I invite or nobody. You also get three options for default post access including public, members only or paid-members only. If you don't want to make a default access level across all posts, then you can alter each individual post for a specific access level.
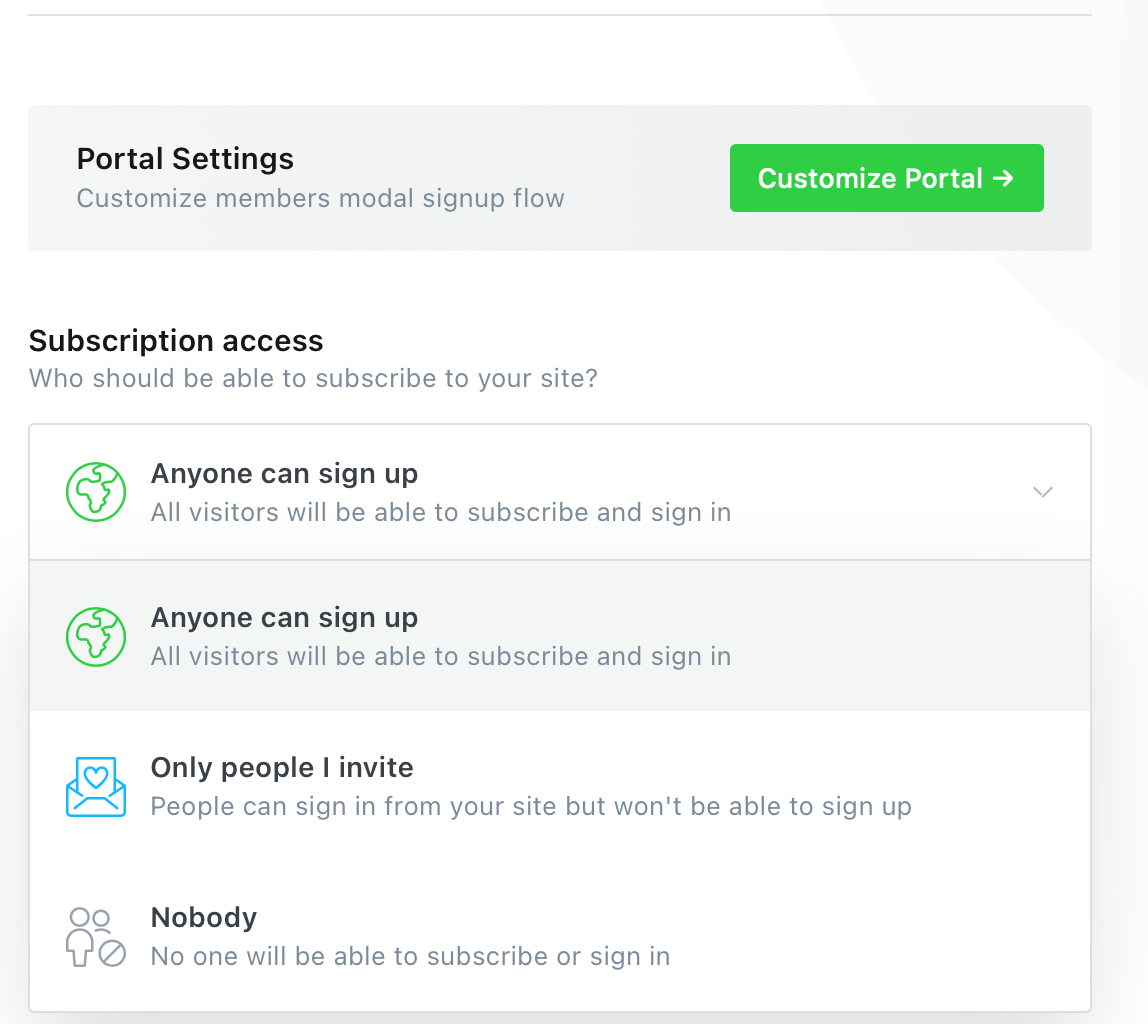
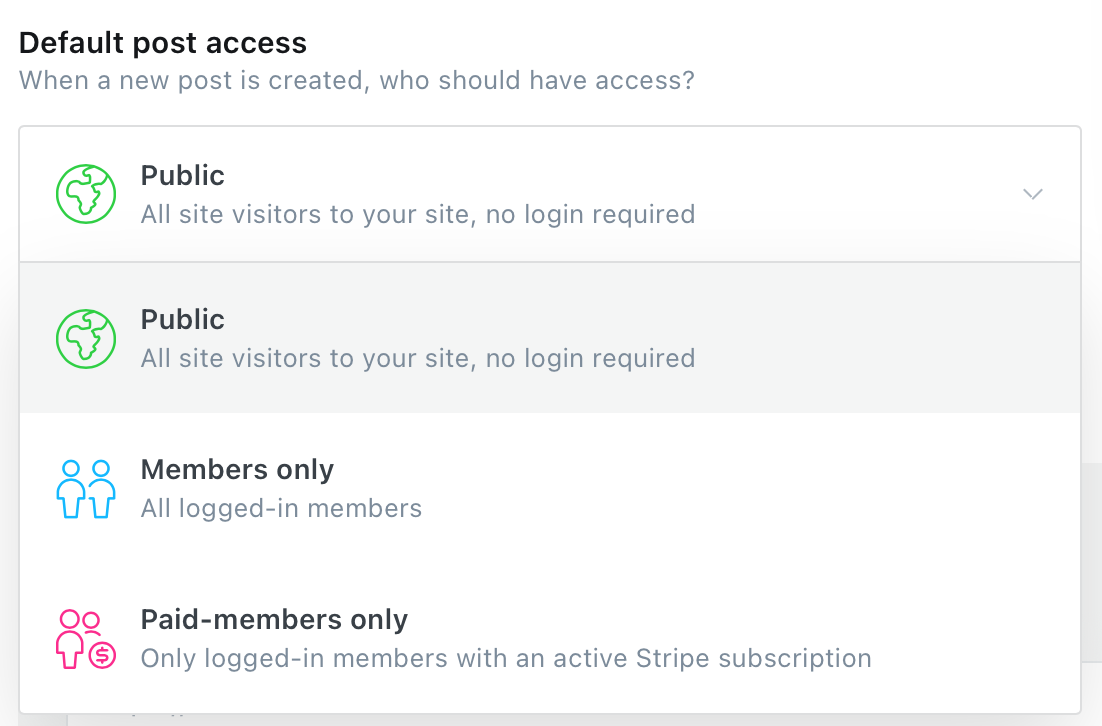
Subscription access (left) and default post access (right).
2. Next, to customise your portal, click this button. This will look different if you have free memberships compared to paid memberships.

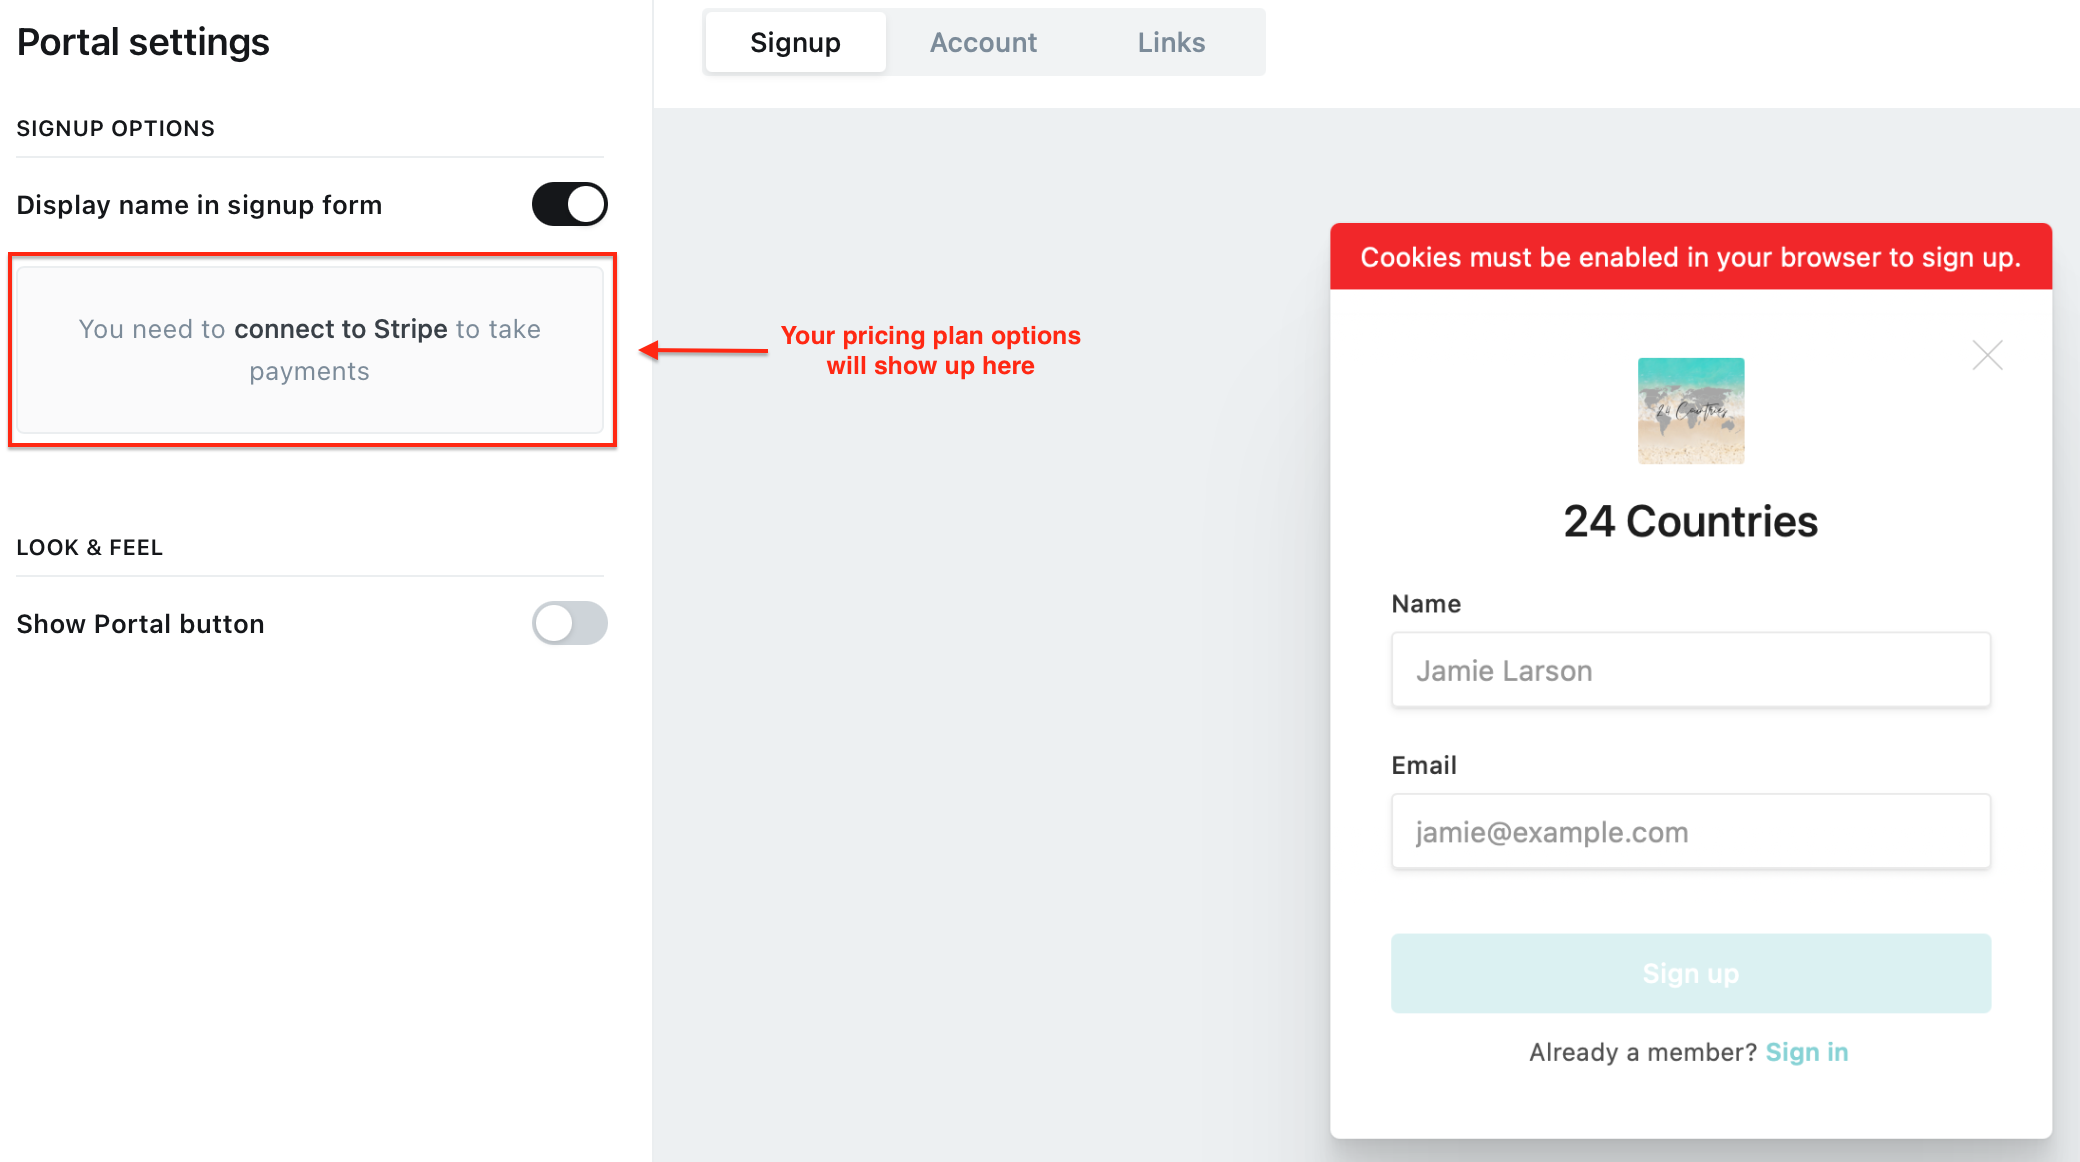
3. The sign up box is what your audience will see when they are trying to sign up for your site. If you have opted for free memberships, then under 'signup options', you will only get the option to activate/deactivate 'display name in sign up'. If you deactivate this, subscribers will not be required to put in their full name, just their email address. You will also get this option for paid memberships but under 'signup options', your pricing plans will also show up here. This will then give your subscribers options on what plan they want to select.
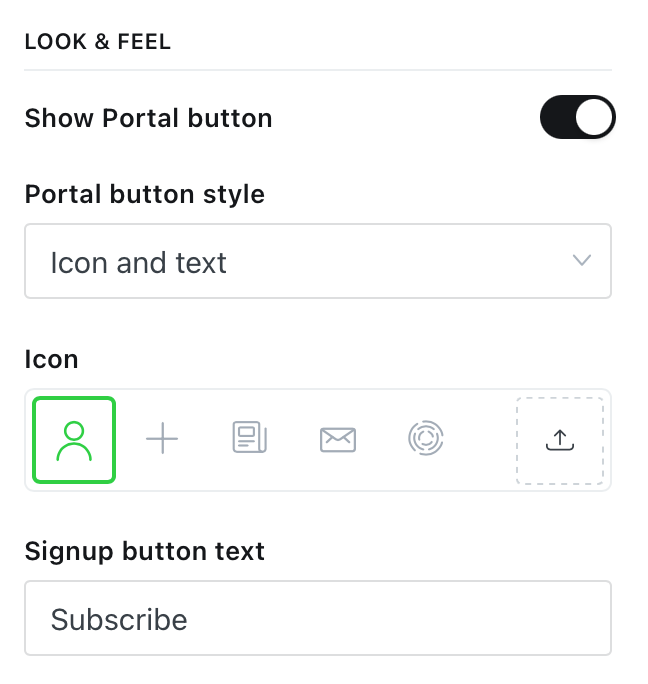
4. You can also edit the 'look & feel' of the portal button to be more fitting to your brand and site. This is the portal button:

5. You can choose whether you want the 'portal button style' to include the 'icon and text', which is the outlined person icon and the 'subscribe' text or icon only or text only. You can also change the icon from the outlined person to a range of different options including a 'plus' sign, a 'newsletter' icon or an 'email' icon. Finally, you can change the sign up button text from 'subscribe' to something that's more fitting for your site. So many options!
Links to my other 'how-to' blog posts:
 Kirsty
 Kirsty
 Kirsty
 Kirsty
 Kirsty
 Kirsty
 Kirsty
 Kirsty
 Kirsty
 Kirsty
In the meantime, if you have any questions please don't hesitate to contact me via the contact form.